To install Ollama on Linux, run curl -fsSL https://ollama.com/install.sh | sh — that single command handles the binary, systemd service, and user creation on any supported distribution. This article walks through every installation method in detail, including manual installs, Docker, GPU acceleration, and production configuration for Ubuntu, Fedora, and RHEL-family systems.
Ollama has become the standard tool for running large language models locally on Linux hardware. Whether you are setting up a development workstation, a shared inference server, or an air-gapped environment that cannot reach external APIs, Ollama gives you a single binary that manages model downloads, GPU offloading, and a REST API — all without requiring Python environments or complex dependency chains.
What Ollama Does and Why Linux Admins Use It
Ollama is a model runtime for large language models. It wraps llama.cpp (the C++ inference engine for GGUF-format models) in a user-friendly CLI and HTTP API. You tell it which model you want, it downloads the quantized weights, loads them onto your GPU or CPU, and serves inference requests through a local API on port 11434.
From an enterprise perspective, Ranjan et al. emphasize in Agentic AI in Enterprise that choosing between self-hosted inference and cloud APIs is fundamentally a decision about data sovereignty, latency budgets, and total cost of ownership. Ollama on Linux addresses the first two directly: data never leaves the machine, and local inference eliminates network round-trips. For organizations already running GPU-equipped servers for other workloads, the marginal cost of adding Ollama is often lower than monthly API fees once utilization exceeds a few hundred requests per day.
The appeal for Linux administrators is straightforward:
- No cloud dependency. Models run entirely on your hardware. Sensitive data never leaves the machine.
- Single binary deployment. No virtualenvs, no pip, no CUDA toolkit installation (Ollama bundles its own). Drop the binary, start the service.
- Systemd integration. The installer creates a dedicated
ollamauser and a systemd unit file. It behaves like any other Linux service. - Model management. Pull, list, run, copy, and delete models with simple CLI commands — similar to how Docker manages container images.
- GPU auto-detection. Ollama detects NVIDIA and AMD GPUs automatically and offloads model layers without manual configuration.
Common use cases include local code assistance (feeding models into VS Code or Neovim plugins), document summarization pipelines, RAG (retrieval-augmented generation) systems, and private chatbots for teams that cannot use external AI services. For organizations running containerized workloads with Podman or Docker, Ollama also runs well inside containers with GPU passthrough.
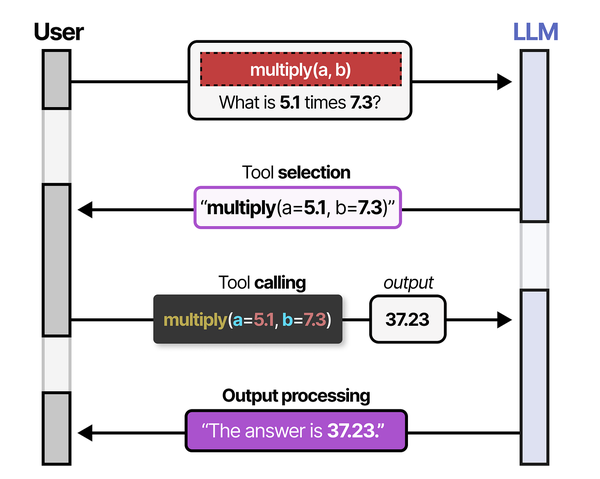
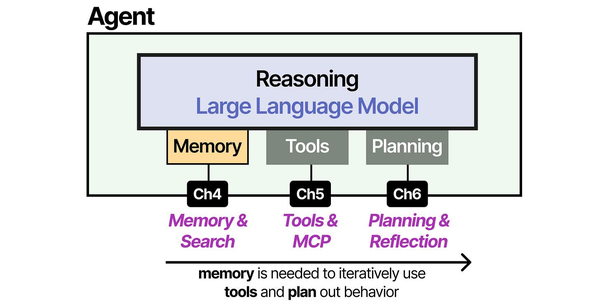
Understanding what happens under the hood when Ollama serves a model helps explain its design choices. As Grootendorst and Alammar describe in An Illustrated Guide to AI Agents, LLMs by themselves are stateless text-to-text functions that cannot interact with their environment without tool and memory modules. Ollama bridges this gap by wrapping the inference engine with a tool-like API layer, systemd lifecycle management, and a model registry that persists state across calls. This architecture turns a raw LLM into something a Linux admin can manage like any other service. Brousseau and Sharp reinforce this point in LLMs in Production, noting that the single biggest operational challenge with LLMs is managing GPU memory allocation during inference. Ollama handles this automatically by detecting available VRAM, calculating how many model layers can be offloaded, and falling back to CPU for any remaining layers.
Install Ollama on Linux (the Fastest Way)
The official install script is the fastest path from zero to running models. It works on Ubuntu, Debian, Fedora, RHEL, CentOS Stream, AlmaLinux, Rocky Linux, openSUSE, and Arch.
curl -fsSL https://ollama.com/install.sh | shWhat this script does behind the scenes:
- Downloads the latest Ollama binary to
/usr/local/bin/ollama - Creates an
ollamasystem user and group - Installs a systemd service unit at
/etc/systemd/system/ollama.service - Enables and starts the service immediately
- Detects NVIDIA GPUs and installs CUDA drivers if they are missing (on supported distributions)
After the script finishes, verify the installation:
ollama --version
systemctl status ollama
You should see the service active and running. Test it by pulling and running a small model:
ollama run llama3.2:1bThat downloads the 1-billion parameter Llama 3.2 model (about 1.3 GB) and drops you into an interactive chat. Type a question, get a response, and press Ctrl+D to exit.
When to avoid the curl-pipe-sh method
Piping scripts from the internet into a root shell is a valid concern. If your security policy prohibits it, or you need to audit every binary before deployment, skip ahead to the manual binary installation section. The script is readable at https://ollama.com/install.sh — review it before running if you prefer.
For air-gapped or restricted environments, manual installation is the only option. We cover that below.
Install Ollama on Ubuntu 24.04 LTS
Ubuntu 24.04 (Noble Numbat) is the most common platform for Ollama deployments. The install script works without modifications, but here is the full breakdown if you want to understand each step or customize the process.
Prerequisites
sudo apt update && sudo apt upgrade -y
sudo apt install -y curl wget lsb-release
Method 1: Official install script
curl -fsSL https://ollama.com/install.sh | shOn Ubuntu, the script detects APT and will install NVIDIA CUDA packages from the official NVIDIA repository if it finds an NVIDIA GPU. It adds the NVIDIA package repository automatically if not already configured.
Method 2: Manual binary installation
Download the binary directly from GitHub releases:
# Download the latest release
curl -L https://ollama.com/download/ollama-linux-amd64.tgz -o ollama-linux-amd64.tgz

# Extract to /usr/local
sudo tar -C /usr/local -xzf ollama-linux-amd64.tgz

# Verify the binary
ollama --version
Create the system user and group:
sudo useradd -r -s /bin/false -U -m -d /usr/share/ollama ollamaIf you want other users on the system to access Ollama (for example, your own login user), add them to the ollama group:
sudo usermod -aG ollama $(whoami)Create the systemd service file manually:
sudo tee /etc/systemd/system/ollama.service > /dev/null <<'EOF'
[Unit]
Description=Ollama Service
After=network-online.target

[Service]
ExecStart=/usr/local/bin/ollama serve
User=ollama
Group=ollama
Restart=always
RestartSec=3
Environment="PATH=/usr/local/sbin:/usr/local/bin:/usr/sbin:/usr/bin:/sbin:/bin"
Environment="OLLAMA_HOST=0.0.0.0:11434"

[Install]
WantedBy=default.target
EOF
Enable and start:
sudo systemctl daemon-reload
sudo systemctl enable --now ollama
sudo systemctl status ollama
Method 3: Snap package
Ollama is not available as an official Snap package from Canonical. There have been community-maintained snaps, but they tend to lag behind releases and sometimes have GPU passthrough issues due to Snap confinement. The recommended approach on Ubuntu remains the install script or the manual binary method.
If you find a snap that works for your use case:
# Community snap (check maintainer and reviews before installing)
sudo snap install ollama --classic
Be aware that Snap strict confinement can interfere with GPU access. Use --classic confinement if the snap supports it, or stick with the native binary installation for GPU workloads.
Updating Ollama on Ubuntu
The install script is also the update mechanism. Run it again to get the latest version:
curl -fsSL https://ollama.com/install.sh | shIt will replace the binary and restart the service. Your downloaded models are preserved — they live in /usr/share/ollama/.ollama/models and are untouched by the update process.
Install Ollama on Fedora 41 and RHEL 9
Fedora 41, RHEL 9, AlmaLinux 9, and Rocky Linux 9 all work with the same installation procedures. The differences are minor: package manager commands (dnf vs. yum), SELinux policies, and available GPU driver repositories.
Fedora 41
# Update system
sudo dnf upgrade --refresh -y

# Install dependencies
sudo dnf install -y curl wget

# Run the install script
curl -fsSL https://ollama.com/install.sh | sh
On Fedora, NVIDIA GPU setup requires RPM Fusion. The Ollama install script will attempt to configure this, but if you run into issues, set up RPM Fusion manually first:
sudo dnf install -y \
  https://mirrors.rpmfusion.org/free/fedora/rpmfusion-free-release-$(rpm -E %fedora).noarch.rpm \
  https://mirrors.rpmfusion.org/nonfree/fedora/rpmfusion-nonfree-release-$(rpm -E %fedora).noarch.rpm

sudo dnf install -y akmod-nvidia xorg-x11-drv-nvidia-cuda
RHEL 9 / AlmaLinux 9 / Rocky Linux 9
RHEL-family distributions require EPEL for some dependencies. Enable it before running the install script:
# Enable EPEL
sudo dnf install -y epel-release

# Enable CodeReady Builder (RHEL) or PowerTools/CRB (Alma/Rocky)
sudo dnf config-manager --set-enabled crb    # AlmaLinux/Rocky
# sudo subscription-manager repos --enable codeready-builder-for-rhel-9-x86_64-rpms  # genuine RHEL

# Run install script
curl -fsSL https://ollama.com/install.sh | sh
SELinux considerations
SELinux is enforcing by default on RHEL-family systems. The Ollama binary runs from /usr/local/bin, which is typically labeled usr_t or bin_t. The systemd service usually works without SELinux modifications, but if you see permission denials in the audit log:
# Check for Ollama-related SELinux denials
sudo ausearch -m avc -ts recent | grep ollama

# Generate and apply a local policy module if needed
sudo ausearch -m avc -ts recent | audit2allow -M ollama-local
sudo semodule -i ollama-local.pp
For a deeper understanding of SELinux policy management, see our guide on Linux security baselines and least privilege.
Firewall rules
If you need Ollama accessible from other machines on your network, open port 11434 through firewalld:
sudo firewall-cmd --permanent --add-port=11434/tcp
sudo firewall-cmd --reload
For detailed firewalld management, refer to our firewalld guide or the advanced firewalld cheat sheet. Be cautious about exposing the Ollama API directly — it has no built-in authentication. A reverse proxy with authentication is strongly recommended for production use.
Install Ollama with Docker
Docker is the cleanest option for environments where you want isolation, easy version pinning, or GPU sharing across multiple services. Ollama publishes official images on Docker Hub.
CPU-only Docker deployment
docker run -d \
  --name ollama \
  -v ollama_data:/root/.ollama \
  -p 11434:11434 \
  ollama/ollama:latest
The -v ollama_data:/root/.ollama mount persists downloaded models across container restarts and upgrades.
Docker with NVIDIA GPU
You need the NVIDIA Container Toolkit installed on the host. Then pass the GPU through:
# Install NVIDIA Container Toolkit (Ubuntu/Debian)
curl -fsSL https://nvidia.github.io/libnvidia-container/gpgkey | \
  sudo gpg --dearmor -o /usr/share/keyrings/nvidia-container-toolkit-keyring.gpg

curl -s -L https://nvidia.github.io/libnvidia-container/stable/deb/nvidia-container-toolkit.list | \
  sed 's#deb https://#deb [signed-by=/usr/share/keyrings/nvidia-container-toolkit-keyring.gpg] https://#g' | \
  sudo tee /etc/apt/sources.list.d/nvidia-container-toolkit.list

sudo apt update && sudo apt install -y nvidia-container-toolkit
sudo nvidia-ctk runtime configure --runtime=docker
sudo systemctl restart docker
Now run Ollama with GPU access:
docker run -d \
  --name ollama \
  --gpus all \
  -v ollama_data:/root/.ollama \
  -p 11434:11434 \
  ollama/ollama:latest
Docker with AMD GPU
docker run -d \
  --name ollama \
  --device /dev/kfd \
  --device /dev/dri \
  -v ollama_data:/root/.ollama \
  -p 11434:11434 \
  ollama/ollama:rocm
Note the :rocm tag — this is a separate image built with AMD ROCm support. The default :latest tag only includes NVIDIA CUDA libraries.
Docker Compose
For repeatable deployments, use a compose file:
# docker-compose.yml
services:
  ollama:
    image: ollama/ollama:latest
    container_name: ollama
    ports:
      - "11434:11434"
    volumes:
      - ollama_data:/root/.ollama
    deploy:
      resources:
        reservations:
          devices:
            - driver: nvidia
              count: all
              capabilities: [gpu]
    restart: unless-stopped

volumes:
  ollama_data:
docker compose up -dPulling models inside Docker
Once the container is running, exec into it or use the API:
# Using docker exec
docker exec -it ollama ollama pull llama3.2:3b

# Or use the API directly from the host
curl http://localhost:11434/api/pull -d '{"name": "llama3.2:3b"}'
For more on Docker architecture and networking, see our Docker architecture guide.
Configure GPU Acceleration (NVIDIA and AMD)
Ollama runs on CPU by default, but GPU acceleration is what makes it practical for models larger than 3 billion parameters. Without a GPU, a 7B model generates about 5-10 tokens per second on a modern CPU. With a mid-range NVIDIA GPU, that jumps to 40-80 tokens per second.
NVIDIA GPU setup
Ollama bundles its own CUDA libraries, so you do not need the full CUDA Toolkit installed. You only need working NVIDIA kernel drivers. There are two driver options:
Option A: Proprietary NVIDIA driver (recommended)
On Ubuntu 24.04:
# Check available driver versions
ubuntu-drivers list

# Install the recommended driver
sudo ubuntu-drivers install

# Or install a specific version
sudo apt install -y nvidia-driver-565

# Reboot to load the new kernel module
sudo reboot
On Fedora 41 (via RPM Fusion):
sudo dnf install -y akmod-nvidia
sudo akmods --force
sudo reboot
On RHEL 9 / AlmaLinux / Rocky (via NVIDIA official repo):
# Add NVIDIA CUDA repository
sudo dnf config-manager --add-repo \
  https://developer.download.nvidia.com/compute/cuda/repos/rhel9/x86_64/cuda-rhel9.repo

# Install the driver
sudo dnf module install -y nvidia-driver:latest-dkms

# Reboot
sudo reboot
Option B: NVIDIA open kernel module
Starting with driver version 560+, NVIDIA offers open-source kernel modules that work with Turing (RTX 20-series) and newer GPUs. These are now the default for new installations on many distributions.
On Ubuntu:
sudo apt install -y nvidia-driver-565-openOn Fedora (the akmod-nvidia package from RPM Fusion uses the open modules by default for supported GPUs starting with Fedora 40).
After driver installation, verify GPU detection:
# Check NVIDIA driver is loaded
nvidia-smi

# Verify Ollama sees the GPU
ollama run llama3.2:1b --verbose 2>&1 | head -20
The nvidia-smi output should show your GPU model, driver version, and CUDA version. When Ollama runs a model, you will see GPU utilization increase in nvidia-smi.
AMD GPU setup with ROCm
AMD GPU support in Ollama requires ROCm (Radeon Open Compute). Supported GPUs include RX 7900 XTX, RX 7900 XT, RX 7800 XT, RX 6900 XT, RX 6800 XT, and the Instinct series (MI250, MI300X). Consumer cards below the RX 6800 XT generally lack the VRAM for useful model sizes.
On Ubuntu 24.04:
# Add the ROCm APT repository
sudo mkdir -p --mode=0755 /etc/apt/keyrings
wget https://repo.radeon.com/rocm/rocm.gpg.key -O - | \
  gpg --dearmor | sudo tee /etc/apt/keyrings/rocm.gpg > /dev/null

echo "deb [arch=amd64 signed-by=/etc/apt/keyrings/rocm.gpg] \
  https://repo.radeon.com/rocm/apt/6.4 noble main" | \
  sudo tee /etc/apt/sources.list.d/rocm.list

sudo apt update
sudo apt install -y rocm-libs rocm-hip-runtime

# Add your user to the render and video groups
sudo usermod -aG render,video $(whoami)
sudo usermod -aG render,video ollama

# Reboot
sudo reboot
On RHEL 9:
# Add ROCm repo
cat <<EOF | sudo tee /etc/yum.repos.d/rocm.repo
[rocm]
name=ROCm
baseurl=https://repo.radeon.com/rocm/rhel9/6.4/main
enabled=1
gpgcheck=1
gpgkey=https://repo.radeon.com/rocm/rocm.gpg.key
EOF

sudo dnf install -y rocm-libs rocm-hip-runtime

sudo usermod -aG render,video ollama
sudo reboot
After installing ROCm, restart the Ollama service and verify:
sudo systemctl restart ollama
rocm-smi   # Should show your AMD GPU
ollama run llama3.2:1b
Multi-GPU configurations
Ollama supports multi-GPU inference. If you have multiple NVIDIA GPUs, Ollama automatically splits model layers across them. To restrict Ollama to specific GPUs, use the CUDA_VISIBLE_DEVICES environment variable:
# Only use GPU 0 and GPU 1
sudo systemctl edit ollama
# Add under [Service]:
# Environment="CUDA_VISIBLE_DEVICES=0,1"
For AMD multi-GPU, use HIP_VISIBLE_DEVICES instead:
# Environment="HIP_VISIBLE_DEVICES=0,1"Post-Install Configuration and Systemd
The default Ollama installation works out of the box for local use, but production deployments need tuning. All configuration is done through environment variables in the systemd unit file.
Key environment variables
Edit the systemd override file:
sudo systemctl edit ollamaThis opens an editor for /etc/systemd/system/ollama.service.d/override.conf. Add your overrides:
[Service]
Environment="OLLAMA_HOST=0.0.0.0:11434"
Environment="OLLAMA_MODELS=/data/ollama/models"
Environment="OLLAMA_NUM_PARALLEL=4"
Environment="OLLAMA_MAX_LOADED_MODELS=2"
Environment="OLLAMA_KEEP_ALIVE=10m"
Environment="OLLAMA_DEBUG=0"
What each variable controls:
| Variable | Default | Description |
|---|---|---|
OLLAMA_HOST | 127.0.0.1:11434 | Bind address. Set to 0.0.0.0:11434 for remote access. |
OLLAMA_MODELS | /usr/share/ollama/.ollama/models | Directory where models are stored. Useful for pointing to a larger disk. |
OLLAMA_NUM_PARALLEL | 1 | Number of concurrent requests to process. Increase for multi-user setups. |
OLLAMA_MAX_LOADED_MODELS | 1 | Maximum number of models kept loaded in VRAM simultaneously. |
OLLAMA_KEEP_ALIVE | 5m | How long a model stays loaded in memory after the last request. |
OLLAMA_ORIGINS | (empty) | Allowed CORS origins for the API. Set to * for open access. |
Apply changes:
sudo systemctl daemon-reload
sudo systemctl restart ollama
Moving model storage to a different disk
Models can be large. Llama 3.1 70B at Q4_K_M quantization is about 40 GB. If your root filesystem is too small, point models to a separate mount:
# Create the directory on the larger disk
sudo mkdir -p /data/ollama/models
sudo chown ollama:ollama /data/ollama/models

# Set the environment variable
sudo systemctl edit ollama
# Add: Environment="OLLAMA_MODELS=/data/ollama/models"

sudo systemctl daemon-reload
sudo systemctl restart ollama
Existing models in the old location will not be automatically moved. Either re-pull them or manually copy the directory contents:
sudo rsync -av /usr/share/ollama/.ollama/models/ /data/ollama/models/
sudo chown -R ollama:ollama /data/ollama/models
Systemd resource controls
For shared servers, you may want to limit Ollama's resource consumption:
sudo systemctl edit ollama[Service]
# Limit to 32 GB of RAM
MemoryMax=32G
# Limit CPU to 8 cores
CPUQuota=800%
# Set OOM kill priority (higher = killed first)
OOMScoreAdjust=500For more on systemd service management and resource controls, see our articles on systemd boot targets and init system deep dive and process management with systemd.
Logging
Ollama logs through systemd journal by default:
# View Ollama logs
journalctl -u ollama -f

# View logs from the last hour
journalctl -u ollama --since "1 hour ago"

# Enable debug logging for troubleshooting
sudo systemctl edit ollama
# Add: Environment="OLLAMA_DEBUG=1"
sudo systemctl daemon-reload && sudo systemctl restart ollama
Managing Models: Pull, Run, and Benchmark
Ollama manages models similarly to how Docker manages images. Models are stored locally, versioned by tags, and can be pulled from the Ollama library at ollama.com/library.
Pull models
# Pull a specific model
ollama pull llama3.2:3b

# Pull a larger model
ollama pull llama3.1:8b

# Pull a code-focused model
ollama pull codellama:13b

# Pull with a specific quantization
ollama pull llama3.1:8b-instruct-q5_K_M
Model tags follow the pattern name:variant. Common variants include parameter counts (1b, 3b, 7b, 8b, 13b, 70b) and quantization levels (q4_0, q4_K_M, q5_K_M, q8_0, fp16).
List downloaded models
ollama listOutput example:
NAME                    ID              SIZE      MODIFIED
llama3.2:3b             a80c4f17acd5    2.0 GB    2 hours ago
llama3.1:8b             62716a39cb2f    4.7 GB    1 day ago
codellama:13b           9f438cb9cd58    7.4 GB    3 days ago
Run a model interactively
ollama run llama3.2:3bThis starts an interactive chat session. Type your prompts and press Enter. Use /bye or Ctrl+D to exit.
Pass a single prompt directly:
ollama run llama3.2:3b "Explain Linux namespaces in three sentences"Show model details
ollama show llama3.2:3bThis displays the model's Modelfile, including the template format, parameter settings, system prompt, and license information. Useful for understanding what quantization and context length a model uses.
# Show just the license
ollama show llama3.2:3b --license

# Show the Modelfile
ollama show llama3.2:3b --modelfile
Delete models
# Remove a specific model
ollama rm codellama:13b

# Check disk usage before and after
du -sh /usr/share/ollama/.ollama/models/
Create custom models
You can create custom models with modified system prompts or parameters by writing a Modelfile:
cat <<EOF > Modelfile
FROM llama3.2:3b
SYSTEM "You are a senior Linux system administrator. Answer questions about Linux systems, networking, and infrastructure. Be concise and precise. Always include relevant commands."
PARAMETER temperature 0.3
PARAMETER num_ctx 4096
EOF

ollama create linux-admin -f Modelfile
ollama run linux-admin "How do I check which process is using port 8080?"
Benchmarking model performance
Measure tokens per second to gauge your hardware's capability:
# Use the verbose flag to see performance metrics
ollama run llama3.2:3b --verbose "Write a 200-word summary of the Linux kernel" 2>&1 | tail -5
The output includes eval rate (tokens/second), load duration, prompt eval duration, and total duration. On a system with an NVIDIA RTX 4090 and 24 GB VRAM, expect roughly 100-120 tokens/second for a 3B model and 60-80 tokens/second for an 8B model.
Using the REST API
Every CLI command has an API equivalent. The API is useful for scripting and integration:
# Generate a completion
curl -s http://localhost:11434/api/generate -d '{
  "model": "llama3.2:3b",
  "prompt": "What is a Linux inode?",
  "stream": false
}' | jq .response

# Chat API (multi-turn conversation)
curl -s http://localhost:11434/api/chat -d '{
  "model": "llama3.2:3b",
  "messages": [
    {"role": "user", "content": "Explain cgroups v2 in Linux"}
  ],
  "stream": false
}' | jq .message.content

# List local models via API
curl -s http://localhost:11434/api/tags | jq .

# Pull a model via API
curl http://localhost:11434/api/pull -d '{"name": "mistral:7b"}'
Expose Ollama API Behind Nginx
Running Ollama behind an nginx reverse proxy adds TLS termination, basic authentication, rate limiting, and access logging — all things Ollama's built-in HTTP server does not provide. This is essential for any production deployment where multiple users or applications access the API over a network.
Basic nginx reverse proxy configuration
First, make sure Ollama is bound to localhost only (the default). If you previously changed OLLAMA_HOST to 0.0.0.0, change it back to 127.0.0.1:11434 since nginx will handle external connections.
sudo systemctl edit ollama
# Set: Environment="OLLAMA_HOST=127.0.0.1:11434"
sudo systemctl daemon-reload && sudo systemctl restart ollama
Nginx configuration:
upstream ollama_backend {
    server 127.0.0.1:11434;
    keepalive 32;
}

server {
    listen 443 ssl http2;
    server_name ollama.example.com;

    ssl_certificate     /etc/letsencrypt/live/ollama.example.com/fullchain.pem;
    ssl_certificate_key /etc/letsencrypt/live/ollama.example.com/privkey.pem;

    # Basic authentication
    auth_basic "Ollama API";
    auth_basic_user_file /etc/nginx/.ollama_htpasswd;

    # Rate limiting
    limit_req_zone $binary_remote_addr zone=ollama_limit:10m rate=10r/s;

    location / {
        limit_req zone=ollama_limit burst=20 nodelay;

        proxy_pass http://ollama_backend;
        proxy_set_header Host $host;
        proxy_set_header X-Real-IP $remote_addr;
        proxy_set_header X-Forwarded-For $proxy_add_x_forwarded_for;
        proxy_set_header X-Forwarded-Proto $scheme;

        # Streaming support (essential for token-by-token responses)
        proxy_buffering off;
        proxy_cache off;
        proxy_read_timeout 600s;
        proxy_send_timeout 600s;

        # Increase body size for large context windows
        client_max_body_size 50m;
    }
}

server {
    listen 80;
    server_name ollama.example.com;
    return 301 https://$server_name$request_uri;
}
Create the htpasswd file
sudo apt install -y apache2-utils   # Ubuntu/Debian
# sudo dnf install -y httpd-tools   # Fedora/RHEL

sudo htpasswd -c /etc/nginx/.ollama_htpasswd apiuser
Important nginx settings for LLM inference
Two settings deserve attention:
- proxy_buffering off — Ollama streams tokens one at a time. If nginx buffers the response, the client will not receive tokens until the entire response is generated, defeating the purpose of streaming.
- proxy_read_timeout 600s — Large models or long prompts can take minutes to process. The default 60-second timeout will kill the connection mid-inference.
Test the proxy:
# Test through the reverse proxy
curl -u apiuser:yourpassword https://ollama.example.com/api/tags
For a thorough walkthrough on nginx reverse proxy and load balancing configuration, see our nginx web server guide.
CORS configuration
If web applications need to call the Ollama API from a browser, configure CORS either through Ollama's OLLAMA_ORIGINS environment variable or through nginx headers:
# In the nginx location block:
add_header Access-Control-Allow-Origin "https://your-app.example.com" always;
add_header Access-Control-Allow-Methods "GET, POST, OPTIONS" always;
add_header Access-Control-Allow-Headers "Authorization, Content-Type" always;

if ($request_method = OPTIONS) {
    return 204;
}
Troubleshooting Common Ollama Issues on Linux
These are the five most frequent problems people run into when setting up Ollama on Linux, based on GitHub issues and community forums.
1. "Error: could not connect to ollama app"
This means the Ollama server is not running or is not listening where the client expects it.
# Check if the service is running
systemctl status ollama

# Check what address and port it is listening on
ss -tlnp | grep 11434

# Check for port conflicts
sudo lsof -i :11434

# If the service failed to start, check logs
journalctl -u ollama --no-pager -n 50
Common causes: the service did not start after installation (run sudo systemctl start ollama), or another process is using port 11434.
2. GPU not detected / running on CPU only
# NVIDIA: verify driver is loaded
nvidia-smi

# If nvidia-smi fails, check driver installation
lsmod | grep nvidia
dmesg | grep -i nvidia

# AMD: verify ROCm is installed
rocm-smi

# Check Ollama's GPU detection in debug mode
OLLAMA_DEBUG=1 ollama serve 2>&1 | grep -i gpu
The most common cause is missing or mismatched NVIDIA drivers. The driver version must support the CUDA version that Ollama expects. Restart the Ollama service after installing or updating GPU drivers — the service caches GPU information at startup.
sudo systemctl restart ollama3. Out of memory (OOM) errors
If a model is too large for your GPU VRAM, Ollama falls back to CPU. If it is also too large for system RAM, you get an OOM error.
# Check available VRAM
nvidia-smi --query-gpu=memory.free --format=csv

# Check system RAM
free -h

# Use a smaller quantization
ollama pull llama3.1:8b-instruct-q4_0   # ~4.7 GB instead of ~8 GB for q8
Rule of thumb for VRAM requirements: multiply the model parameter count by the quantization bytes per parameter. A 7B model at Q4 needs roughly 4-5 GB of VRAM. A 70B model at Q4 needs around 40 GB.
4. Slow inference / low tokens per second
# Check if the model is actually using the GPU
nvidia-smi   # Watch GPU utilization during inference

# Check if layers are being offloaded
OLLAMA_DEBUG=1 ollama run llama3.2:3b --verbose "test" 2>&1 | grep -i "layer\|gpu\|offload"

# Check CPU governor (should be performance, not powersave)
cat /sys/devices/system/cpu/cpu0/cpufreq/scaling_governor
sudo cpupower frequency-set -g performance
Other causes of slow inference: thermal throttling (check nvidia-smi for temperature), PCIe bandwidth limitations (GPU should be in an x16 slot), and memory bandwidth (DDR4 vs DDR5 matters for CPU inference).
5. Permission denied errors
# Fix model directory ownership
sudo chown -R ollama:ollama /usr/share/ollama/.ollama

# If using a custom model path
sudo chown -R ollama:ollama /data/ollama/models

# Fix SELinux context (RHEL/Fedora)
sudo restorecon -Rv /usr/local/bin/ollama
sudo restorecon -Rv /usr/share/ollama

# Check if your user is in the ollama group
groups $(whoami) | grep ollama
# If not:
sudo usermod -aG ollama $(whoami)
# Log out and back in for group change to take effect
Related Articles
- Deploy a Private ChatGPT on Your Linux Server with Ollama and Open WebUI
- Best Ollama Models for Linux Servers: 2026 Benchmarks and Recommendations
- Ollama on Ubuntu 24.04 LTS: Known Issues, Fixes, and Optimization
- Install NVIDIA Drivers and CUDA on Linux Server for AI: The No-Nonsense Guide (2026)
Further Reading
- Grootendorst, M. & Alammar, J. (2025). An Illustrated Guide to AI Agents. O'Reilly Media. Covers agent memory systems, RAG pipelines, tool usage, MCP protocol, and context engineering with clear visual explanations.
- Ranjan, R. et al. (2025). Agentic AI in Enterprise. Apress. Explores enterprise AI architecture, RAG vs fine-tuning trade-offs, vector databases, prompt engineering, GPU acceleration, and Kubernetes orchestration for production AI.
- Brousseau, D. & Sharp, T. (2025). LLMs in Production. Manning Publications. Covers neural network fundamentals, transformer architecture, GPU management, latency optimization, Kubernetes deployment, MLOps pipelines, embeddings, and model quantization.
FAQ
What are the minimum hardware requirements to install Ollama on Linux?
Ollama itself requires very little: a 64-bit x86 or ARM processor, 4 GB of RAM minimum (8 GB recommended), and enough disk space for the models you want to run. The real constraint is the models. A 3B parameter model needs about 2 GB of disk and 3-4 GB of RAM. A 7-8B model needs about 5 GB of disk and 6-8 GB of RAM. For GPU acceleration, you need an NVIDIA GPU with at least 6 GB of VRAM (GTX 1060 or newer) or an AMD GPU supported by ROCm (RX 6800 XT or newer). CPU-only inference works but is 5-10x slower than GPU inference.
Can Ollama use both NVIDIA and AMD GPUs at the same time?
No. Ollama supports multiple GPUs of the same vendor (multiple NVIDIA cards or multiple AMD cards), but it cannot mix NVIDIA and AMD GPUs in a single instance. If you have both, Ollama will default to NVIDIA. You can force AMD by setting CUDA_VISIBLE_DEVICES= (empty) to hide NVIDIA GPUs, but this is not an officially supported configuration. For best results, use GPUs from one vendor.
How do I update Ollama to the latest version on Linux?
Run the same install command: curl -fsSL https://ollama.com/install.sh | sh. The script detects the existing installation, replaces the binary with the latest version, and restarts the systemd service. Your downloaded models are not affected — they remain in the models directory. If you installed manually, download the new binary from https://ollama.com/download/ollama-linux-amd64.tgz, extract it to /usr/local/, and restart the service with sudo systemctl restart ollama.
Is Ollama secure enough for production use with sensitive data?
Ollama's HTTP API has no built-in authentication or encryption. By default, it listens only on localhost (127.0.0.1), which prevents remote access. For production use, keep Ollama on localhost and place it behind a reverse proxy (nginx, Caddy, or Traefik) that provides TLS encryption, authentication, and rate limiting. Never expose port 11434 directly to the internet. All inference happens locally on your hardware, so the data processing itself is private — the security concern is only about network access to the API.
How much disk space do Ollama models take up?
It depends on the model size and quantization. Here are common models and their approximate sizes: Llama 3.2 1B (1.3 GB), Llama 3.2 3B (2.0 GB), Llama 3.1 8B (4.7 GB), Llama 3.1 70B Q4_K_M (40 GB), Mistral 7B (4.1 GB), CodeLlama 34B (19 GB). All downloaded models are stored in /usr/share/ollama/.ollama/models by default. You can change this location by setting the OLLAMA_MODELS environment variable. Models share base layers when possible — pulling two variants of the same model does not double the disk usage.