Running a private ChatGPT on your own Linux server gives you something no cloud service can: total control over your data, your models, and your costs. With Ollama serving models through a local API and Open WebUI providing a polished browser-based chat interface, you can deploy a private chatgpt linux server ollama open webui stack that rivals commercial offerings — without sending a single prompt to a third-party server. This guide walks you through every step of a production-grade deployment on Ubuntu 24.04, from installing NVIDIA drivers to configuring HTTPS with Let's Encrypt, user authentication, and automated maintenance.
For organizations deploying this stack in production, Ranjan et al. recommend in Agentic AI in Enterprise implementing proper authentication, audit logging, and data retention policies from the start. Open WebUI supports OAuth2 and basic authentication out of the box, and its SQLite database stores all conversation history locally. Brousseau and Sharp add in LLMs in Production that monitoring both GPU utilization and response latency is essential: if response times degrade during business hours, the solution is typically to either upgrade to a faster GPU, enable model quantization, or implement request queuing rather than simply adding more concurrent Ollama instances.
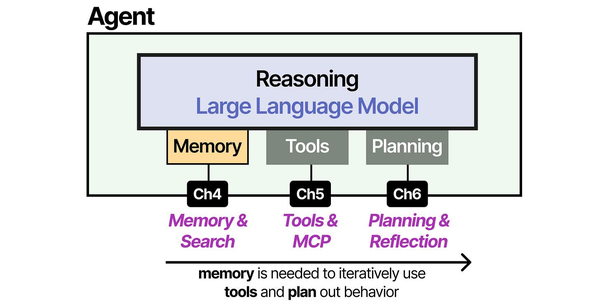
Building a private ChatGPT is essentially assembling the same augmentation layers that commercial products provide. As Grootendorst and Alammar detail in An Illustrated Guide to AI Agents, the gap between a raw LLM and a usable assistant lies in three modules: memory (conversation history and context management), tools (web search, file handling, code execution), and planning (multi-step reasoning). Open WebUI provides the memory and tool layers, while Ollama handles the core inference. Understanding this architecture helps when troubleshooting issues. If the assistant forgets context mid-conversation, the problem is in the memory layer (Open WebUI's session management), not the LLM itself.
This is not a toy setup. By the end of this guide, you will have a multi-user self-hosted ChatGPT running behind nginx with TLS, automatic model loading, systemd-managed services, firewall rules, and a backup strategy. Your team can use it from any browser on your network — or over the internet if you choose — with the same conversation experience as ChatGPT, but running entirely on hardware you own.
What You Get: Your Own Private ChatGPT
The architecture is straightforward. Ollama runs as a containerized inference engine that loads GGUF-quantized models into GPU VRAM and exposes a local API on port 11434. Open WebUI connects to that API and provides a web-based chat interface with conversation history, user accounts, model switching, file uploads, and RAG (retrieval-augmented generation) — all stored locally in its own database. Nginx sits in front of Open WebUI as a reverse proxy, terminating TLS and handling rate limiting. Everything runs inside Docker containers managed by Docker Compose, so upgrades and rollbacks are a single command.
Here is what this stack delivers compared to using ChatGPT directly:
- Complete data privacy. Prompts and responses never leave your server. This matters for legal, medical, financial, and proprietary code use cases where cloud AI policies are unacceptable.
- No per-token costs. After the hardware investment, inference is free. A team of 20 people can use it all day without generating a bill.
- Model flexibility. Run Llama 3.1, Mistral, CodeLlama, Phi-3, Gemma 2, DeepSeek Coder, or any GGUF model. Switch between them per conversation. Run specialized fine-tuned models for your domain.
- Multi-user with permissions. Open WebUI supports user registration, admin roles, and shared conversations. You control who accesses what.
- Offline capable. Once models are downloaded, the entire system works without internet access — useful for air-gapped or restricted environments.
The tradeoff is obvious: you need a GPU. But as we covered in our GPU buyer's guide, a used Tesla P40 costs under $150 and runs 7B–8B models comfortably. You do not need a $2,000 card to get useful results.
Prerequisites and Hardware Requirements
Before starting, make sure your server meets these minimum requirements:
- OS: Ubuntu 24.04 LTS (server or desktop). This guide uses Ubuntu-specific commands; adapt
aptcommands for Fedora/RHEL withdnf. - GPU: NVIDIA GPU with at least 8 GB VRAM for 7B models, 16 GB+ for 13B models, 24 GB+ for 30B+ models. AMD GPUs work with Ollama's ROCm support but are not covered here.
- RAM: 16 GB minimum. 32 GB recommended. Models that overflow VRAM spill into system RAM.
- Storage: 50 GB free minimum. Models range from 4–50 GB each. Use SSD or NVMe — model loading from spinning disks is painful.
- Network: A domain name pointed at your server's public IP if you want HTTPS with Let's Encrypt. For LAN-only use, you can use self-signed certificates.
- Access: Root or sudo access via SSH.
Let's verify your GPU is detected before doing anything else:
lspci | grep -i nvidiaYou should see output showing your NVIDIA card. If nothing appears, the GPU is not seated properly or not recognized by the kernel. Fix that before continuing.
Update the system to start clean:
sudo apt update && sudo apt upgrade -y
sudo apt install -y curl wget git software-properties-common apt-transport-https ca-certificates gnupg lsb-release
Install Docker and NVIDIA Container Toolkit
We run everything in Docker containers for isolation, reproducibility, and easy upgrades. The NVIDIA Container Toolkit lets Docker containers access the host GPU — this is what makes GPU-accelerated inference possible inside containers.
Install Docker Engine
Remove any old Docker packages that might conflict, then install Docker from the official repository:
# Remove old versions
sudo apt remove -y docker docker-engine docker.io containerd runc 2>/dev/null

# Add Docker GPG key and repository
sudo install -m 0755 -d /etc/apt/keyrings
curl -fsSL https://download.docker.com/linux/ubuntu/gpg | sudo gpg --dearmor -o /etc/apt/keyrings/docker.gpg
sudo chmod a+r /etc/apt/keyrings/docker.gpg

echo \
  "deb [arch=$(dpkg --print-architecture) signed-by=/etc/apt/keyrings/docker.gpg] https://download.docker.com/linux/ubuntu \
  $(. /etc/os-release && echo "$VERSION_CODENAME") stable" | \
  sudo tee /etc/apt/sources.list.d/docker.list > /dev/null

# Install Docker Engine
sudo apt update
sudo apt install -y docker-ce docker-ce-cli containerd.io docker-buildx-plugin docker-compose-plugin

# Add your user to the docker group
sudo usermod -aG docker $USER

# Verify
sudo docker run --rm hello-world
The last command should print "Hello from Docker!" confirming the engine works. Log out and back in (or run newgrp docker) for the group change to take effect.
Install NVIDIA Drivers
Ubuntu 24.04 ships with NVIDIA driver packages in its repository. Install the latest recommended driver:
# Check recommended driver
sudo ubuntu-drivers devices

# Install the recommended driver (typically nvidia-driver-550 or newer)
sudo apt install -y nvidia-driver-550

# Reboot to load the driver
sudo reboot
After reboot, verify the driver is loaded:
nvidia-smiYou should see a table showing your GPU model, driver version, CUDA version, temperature, and memory usage. If nvidia-smi fails, the driver did not install correctly — check dmesg | grep -i nvidia for errors.
Install NVIDIA Container Toolkit
This toolkit allows Docker to pass GPU access into containers:
# Add NVIDIA container toolkit repository
curl -fsSL https://nvidia.github.io/libnvidia-container/gpgkey | \
  sudo gpg --dearmor -o /usr/share/keyrings/nvidia-container-toolkit-keyring.gpg

curl -s -L https://nvidia.github.io/libnvidia-container/stable/deb/nvidia-container-toolkit.list | \
  sed 's#deb https://#deb [signed-by=/usr/share/keyrings/nvidia-container-toolkit-keyring.gpg] https://#g' | \
  sudo tee /etc/apt/sources.list.d/nvidia-container-toolkit.list

# Install
sudo apt update
sudo apt install -y nvidia-container-toolkit

# Configure Docker to use NVIDIA runtime
sudo nvidia-ctk runtime configure --runtime=docker
sudo systemctl restart docker

# Verify GPU access inside containers
sudo docker run --rm --gpus all nvidia/cuda:12.6.0-base-ubuntu24.04 nvidia-smi
That last command runs nvidia-smi inside a container. If you see the same GPU table as before, GPU passthrough is working. This is the foundation everything else builds on.
Deploy Ollama and Open WebUI with Docker Compose
With Docker and GPU passthrough confirmed, we can deploy the actual application stack. Using Docker Compose lets us define both services, their networking, storage volumes, and GPU allocation in a single declarative file.
Create the Project Directory
sudo mkdir -p /opt/private-chatgpt/{data/ollama,data/open-webui}
cd /opt/private-chatgpt
Write the Docker Compose File
Create /opt/private-chatgpt/docker-compose.yml with the following content. This is a complete, production-ready configuration for a private chatgpt linux server ollama open webui deployment:
version: "3.9"

services:
  ollama:
    image: ollama/ollama:latest
    container_name: ollama
    restart: unless-stopped
    ports:
      - "127.0.0.1:11434:11434"
    volumes:
      - ./data/ollama:/root/.ollama
    environment:
      - OLLAMA_HOST=0.0.0.0
      - OLLAMA_NUM_PARALLEL=4
      - OLLAMA_MAX_LOADED_MODELS=2
      - NVIDIA_VISIBLE_DEVICES=all
    deploy:
      resources:
        reservations:
          devices:
            - driver: nvidia
              count: all
              capabilities: [gpu]
    healthcheck:
      test: ["CMD", "curl", "-f", "http://localhost:11434/api/tags"]
      interval: 30s
      timeout: 10s
      retries: 5
      start_period: 20s
    networks:
      - chatgpt-net

  open-webui:
    image: ghcr.io/open-webui/open-webui:main
    container_name: open-webui
    restart: unless-stopped
    ports:
      - "127.0.0.1:3000:8080"
    volumes:
      - ./data/open-webui:/app/backend/data
    environment:
      - OLLAMA_BASE_URL=http://ollama:11434
      - WEBUI_SECRET_KEY=CHANGE_ME_TO_A_RANDOM_64_CHAR_STRING
      - WEBUI_AUTH=true
      - ENABLE_SIGNUP=true
      - DEFAULT_USER_ROLE=user
      - ENABLE_RAG_WEB_SEARCH=false
      - ENABLE_IMAGE_GENERATION=false
      - WEBUI_NAME=Private ChatGPT
    depends_on:
      ollama:
        condition: service_healthy
    networks:
      - chatgpt-net

networks:
  chatgpt-net:
    driver: bridge
Key details in this configuration:
- Port binding to 127.0.0.1: Both services bind only to localhost. They are not directly accessible from the network — nginx will handle external access. This is a critical security measure.
- OLLAMA_NUM_PARALLEL=4: Allows up to 4 concurrent inference requests. Increase if your GPU has headroom, decrease on smaller GPUs.
- OLLAMA_MAX_LOADED_MODELS=2: Keeps up to 2 models loaded in VRAM simultaneously. With 24 GB VRAM, you can comfortably keep two 7B models hot. Adjust based on your VRAM.
- WEBUI_SECRET_KEY: Generate a proper random string:
openssl rand -hex 32. This secures session tokens. - WEBUI_AUTH=true: Requires login. The first user to register becomes admin.
- Healthcheck: Docker will not start Open WebUI until Ollama responds to API requests, preventing startup race conditions.
Generate the Secret Key
SECRET=$(openssl rand -hex 32)
sed -i "s/CHANGE_ME_TO_A_RANDOM_64_CHAR_STRING/$SECRET/" /opt/private-chatgpt/docker-compose.yml
echo "Secret key set: $SECRET"
Launch the Stack
cd /opt/private-chatgpt
docker compose up -d
Watch the logs to confirm both containers start correctly:
docker compose logs -fYou should see Ollama reporting "Listening on 0.0.0.0:11434" and Open WebUI starting its Uvicorn server. Press Ctrl+C to stop following logs. Test that the services respond:
# Test Ollama API
curl -s http://localhost:11434/api/tags | python3 -m json.tool

# Test Open WebUI
curl -s -o /dev/null -w "%{http_code}" http://localhost:3000
The Ollama API should return a JSON object with an empty models list. The Open WebUI curl should return HTTP 200. Both services are running but only accessible from the server itself.
Set Up Nginx HTTPS Reverse Proxy
Nginx serves two purposes: it terminates TLS so your users connect over HTTPS, and it adds security headers, rate limiting, and access control. This section creates a production nginx configuration for your private AI server.
Install Nginx and Certbot
sudo apt install -y nginx certbot python3-certbot-nginxObtain a Let's Encrypt Certificate
Make sure your domain's DNS A record points to your server's public IP, then run:
sudo certbot certonly --nginx -d chat.yourdomain.com --non-interactive --agree-tos -m admin@yourdomain.comReplace chat.yourdomain.com with your actual domain. Certbot will automatically set up renewal via a systemd timer.
Create the Nginx Configuration
Create /etc/nginx/sites-available/private-chatgpt with the following complete configuration:
# Rate limiting zones
limit_req_zone $binary_remote_addr zone=chat_limit:10m rate=30r/m;
limit_req_zone $binary_remote_addr zone=api_limit:10m rate=60r/m;
limit_conn_zone $binary_remote_addr zone=conn_limit:10m;

# Upstream for Open WebUI
upstream openwebui {
    server 127.0.0.1:3000;
    keepalive 32;
}

# HTTP redirect to HTTPS
server {
    listen 80;
    listen [::]:80;
    server_name chat.yourdomain.com;
    return 301 https://$host$request_uri;
}

# HTTPS server
server {
    listen 443 ssl http2;
    listen [::]:443 ssl http2;
    server_name chat.yourdomain.com;

    # TLS certificates (Let's Encrypt)
    ssl_certificate /etc/letsencrypt/live/chat.yourdomain.com/fullchain.pem;
    ssl_certificate_key /etc/letsencrypt/live/chat.yourdomain.com/privkey.pem;

    # Modern TLS configuration
    ssl_protocols TLSv1.2 TLSv1.3;
    ssl_ciphers ECDHE-ECDSA-AES128-GCM-SHA256:ECDHE-RSA-AES128-GCM-SHA256:ECDHE-ECDSA-AES256-GCM-SHA384:ECDHE-RSA-AES256-GCM-SHA384;
    ssl_prefer_server_ciphers off;
    ssl_session_cache shared:SSL:10m;
    ssl_session_timeout 1d;
    ssl_session_tickets off;

    # OCSP stapling
    ssl_stapling on;
    ssl_stapling_verify on;
    resolver 1.1.1.1 8.8.8.8 valid=300s;
    resolver_timeout 5s;

    # Security headers
    add_header Strict-Transport-Security "max-age=63072000; includeSubDomains; preload" always;
    add_header X-Content-Type-Options "nosniff" always;
    add_header X-Frame-Options "SAMEORIGIN" always;
    add_header X-XSS-Protection "1; mode=block" always;
    add_header Referrer-Policy "strict-origin-when-cross-origin" always;
    add_header Permissions-Policy "camera=(), microphone=(self), geolocation=()" always;

    # Connection limits
    limit_conn conn_limit 10;

    # Request size limit (for file uploads)
    client_max_body_size 50M;

    # Timeouts for LLM responses (models can take a while)
    proxy_connect_timeout 60s;
    proxy_send_timeout 300s;
    proxy_read_timeout 300s;

    # WebSocket support (required for streaming responses)
    map $http_upgrade $connection_upgrade_val {
        default upgrade;
        ''      close;
    }

    # Main location — proxy to Open WebUI
    location / {
        limit_req zone=chat_limit burst=20 nodelay;

        proxy_pass http://openwebui;
        proxy_set_header Host $host;
        proxy_set_header X-Real-IP $remote_addr;
        proxy_set_header X-Forwarded-For $proxy_add_x_forwarded_for;
        proxy_set_header X-Forwarded-Proto $scheme;

        # WebSocket support
        proxy_http_version 1.1;
        proxy_set_header Upgrade $http_upgrade;
        proxy_set_header Connection $connection_upgrade_val;

        # Buffering off for streaming
        proxy_buffering off;
        proxy_cache off;
    }

    # API endpoints — stricter rate limiting
    location /api/ {
        limit_req zone=api_limit burst=10 nodelay;

        proxy_pass http://openwebui;
        proxy_set_header Host $host;
        proxy_set_header X-Real-IP $remote_addr;
        proxy_set_header X-Forwarded-For $proxy_add_x_forwarded_for;
        proxy_set_header X-Forwarded-Proto $scheme;
        proxy_http_version 1.1;
        proxy_set_header Upgrade $http_upgrade;
        proxy_set_header Connection $connection_upgrade_val;
        proxy_buffering off;
    }

    # Block direct access to Ollama API from outside
    location /ollama/ {
        deny all;
        return 403;
    }

    # Health check endpoint
    location /health {
        access_log off;
        proxy_pass http://openwebui;
    }

    # Static file caching
    location ~* \.(js|css|png|jpg|jpeg|gif|ico|svg|woff|woff2|ttf|eot)$ {
        proxy_pass http://openwebui;
        expires 7d;
        add_header Cache-Control "public, immutable";
    }

    access_log /var/log/nginx/chatgpt-access.log;
    error_log /var/log/nginx/chatgpt-error.log;
}
There is an issue with the nested map directive — in nginx, map must appear at the http context level, not inside a server block. Move the map block to /etc/nginx/conf.d/websocket-map.conf:
# /etc/nginx/conf.d/websocket-map.conf
map $http_upgrade $connection_upgrade_val {
    default upgrade;
    ''      close;
}
Then remove the map block from the server configuration above. Enable the site and test:
# Enable the site
sudo ln -sf /etc/nginx/sites-available/private-chatgpt /etc/nginx/sites-enabled/
sudo rm -f /etc/nginx/sites-enabled/default

# Test configuration
sudo nginx -t

# Reload nginx
sudo systemctl reload nginx
Now navigate to https://chat.yourdomain.com in your browser. You should see the Open WebUI login page served over a valid HTTPS connection.
LAN-Only Setup with Self-Signed Certificate
If your server is not exposed to the internet, generate a self-signed certificate instead:
sudo mkdir -p /etc/nginx/ssl
sudo openssl req -x509 -nodes -days 3650 -newkey rsa:2048 \
  -keyout /etc/nginx/ssl/private-chatgpt.key \
  -out /etc/nginx/ssl/private-chatgpt.crt \
  -subj "/CN=chat.internal.lan"
Update the nginx config to point ssl_certificate and ssl_certificate_key to these files. Your browser will show a certificate warning, but the connection will be encrypted.
Configure User Accounts and Authentication
Open WebUI handles authentication internally. The first user who registers becomes the administrator. This is important: register your admin account immediately after deployment, before anyone else accesses the system.
Create the Admin Account
Open https://chat.yourdomain.com in your browser and click "Sign Up." Enter your name, email, and a strong password. This account automatically receives admin privileges.
Configure Registration Policy
Once logged in as admin, go to Admin Panel > Settings > General:
- Enable New Sign Ups: Turn this off after all your team members have registered, or leave it on if you have a controlled network.
- Default User Role: Set to "User" (not "Admin"). This is already configured in our Docker Compose file.
- Show Admin Details: Disable this to hide admin account info from regular users.
Manage Users
From Admin Panel > Users, you can:
- View all registered users and their roles
- Promote users to admin or demote admins to users
- Disable accounts without deleting them
- View per-user chat history (admin only)
Pre-Create Accounts via API
For larger deployments, create accounts programmatically using the Open WebUI API:
# Get an API token first (login as admin)
TOKEN=$(curl -s -X POST https://chat.yourdomain.com/api/v1/auths/signin \
  -H "Content-Type: application/json" \
  -d '{"email":"admin@yourdomain.com","password":"your-admin-password"}' | \
  python3 -c "import sys,json; print(json.load(sys.stdin)['token'])")

# Create a new user
curl -s -X POST https://chat.yourdomain.com/api/v1/auths/signup \
  -H "Content-Type: application/json" \
  -H "Authorization: Bearer $TOKEN" \
  -d '{
    "name": "Jane Engineer",
    "email": "jane@yourdomain.com",
    "password": "temporary-password-change-me",
    "role": "user"
  }'
Tell each user to change their password after first login through the Settings menu.
Pre-Load Models and Set Defaults
A fresh Ollama installation has no models. Users will see an empty model list until you pull some. Pre-loading models means they are ready instantly when someone starts a conversation.
Pull Models
# Pull common models
docker exec -it ollama ollama pull llama3.1:8b
docker exec -it ollama ollama pull mistral:7b
docker exec -it ollama ollama pull codellama:13b

# Pull an embedding model for RAG (if you plan to use document upload)
docker exec -it ollama ollama pull nomic-embed-text

# List installed models
docker exec -it ollama ollama list
Model sizes for reference:
- llama3.1:8b — 4.9 GB, excellent general-purpose model, strong reasoning
- mistral:7b — 4.1 GB, fast and capable, good for quick tasks
- codellama:13b — 7.4 GB, specialized for code generation and review
- nomic-embed-text — 274 MB, text embedding model for RAG pipelines
- llama3.1:70b — 40 GB, flagship quality, requires 48+ GB VRAM or significant CPU offloading
Set the Default Model in Open WebUI
As admin, go to Admin Panel > Settings > Models. Set the default model to llama3.1:8b or whichever model you want users to see first. You can also hide models you do not want regular users to access.
Create a Model Pre-Loading Script
Create a script that runs after Docker Compose starts to ensure models are always available:
cat > /opt/private-chatgpt/preload-models.sh << 'EOF'
#!/bin/bash
# Pre-load models after Ollama starts

MODELS=(
    "llama3.1:8b"
    "mistral:7b"
    "codellama:13b"
    "nomic-embed-text"
)

echo "Waiting for Ollama to be ready..."
until curl -sf http://localhost:11434/api/tags > /dev/null 2>&1; do
    sleep 2
done
echo "Ollama is ready."

for model in "${MODELS[@]}"; do
    if ! docker exec ollama ollama list 2>/dev/null | grep -q "$(echo $model | cut -d: -f1)"; then
        echo "Pulling $model..."
        docker exec ollama ollama pull "$model"
    else
        echo "$model already installed."
    fi
done

echo "All models ready."
EOF
chmod +x /opt/private-chatgpt/preload-models.sh
Create Custom Model Profiles
Ollama supports Modelfiles that let you create custom model profiles with specific system prompts, temperature settings, and parameters. This is useful for creating purpose-specific assistants:
cat > /opt/private-chatgpt/Modelfile-coder << 'EOF'
FROM codellama:13b
SYSTEM """You are a senior software engineer. You write clean, well-documented code. When asked to write code, provide complete implementations with error handling. When reviewing code, be thorough and specific about issues. Always explain your reasoning."""
PARAMETER temperature 0.3
PARAMETER top_p 0.9
PARAMETER num_ctx 8192
EOF

docker exec -i ollama ollama create code-assistant -f - < /opt/private-chatgpt/Modelfile-coder
This creates a "code-assistant" model variant that appears in the model dropdown in Open WebUI with tuned parameters for coding tasks.
Systemd Service for Auto-Start
Docker Compose's restart: unless-stopped policy handles container restarts, but the Compose stack itself needs to start on boot. Create a systemd service for this:
sudo cat > /etc/systemd/system/private-chatgpt.service << 'EOF'
[Unit]
Description=Private ChatGPT (Ollama + Open WebUI)
Requires=docker.service
After=docker.service network-online.target
Wants=network-online.target

[Service]
Type=oneshot
RemainAfterExit=yes
WorkingDirectory=/opt/private-chatgpt
ExecStart=/usr/bin/docker compose up -d
ExecStop=/usr/bin/docker compose down
ExecStartPost=/opt/private-chatgpt/preload-models.sh
TimeoutStartSec=300
User=root

[Install]
WantedBy=multi-user.target
EOF

sudo systemctl daemon-reload
sudo systemctl enable private-chatgpt.service
sudo systemctl start private-chatgpt.service
Now the entire stack starts automatically on boot, models get pre-loaded, and you can manage it with standard systemd commands:
sudo systemctl status private-chatgpt    # Check status
sudo systemctl restart private-chatgpt   # Restart everything
sudo systemctl stop private-chatgpt      # Stop everything
journalctl -u private-chatgpt -f         # Follow logs
Security Hardening Checklist
A self-hosted AI server is a high-value target. It has GPU resources that cryptominers want and potentially processes sensitive data. Do not skip this section.
Firewall with UFW
Configure Ubuntu's firewall to allow only necessary traffic:
# Enable UFW
sudo ufw default deny incoming
sudo ufw default allow outgoing

# Allow SSH (change port if you use non-standard)
sudo ufw allow 22/tcp comment "SSH"

# Allow HTTP and HTTPS for the web interface
sudo ufw allow 80/tcp comment "HTTP redirect"
sudo ufw allow 443/tcp comment "HTTPS Open WebUI"

# Do NOT open 11434 (Ollama) or 3000 (Open WebUI) — nginx handles external access

# Enable the firewall
sudo ufw enable
sudo ufw status verbose
Restrict Ollama API Access
The Docker Compose file already binds Ollama to 127.0.0.1:11434, making it inaccessible from outside the host. Verify this:
# This should work (from the server itself)
curl -s http://127.0.0.1:11434/api/tags

# This should fail (from another machine)
# curl http://your-server-ip:11434/api/tags → connection refused
If you need other services on the same host to access the Ollama API, keep the 127.0.0.1 binding. Never bind Ollama to 0.0.0.0 unless you have additional network-level controls.
API Key Protection
Open WebUI can generate API keys for programmatic access. As admin, manage this through Admin Panel > Settings > General:
- Disable API key generation for regular users if they do not need it
- Set API key expiration policies
- Monitor API usage through the admin dashboard
If you expose an OpenAI-compatible API endpoint through Open WebUI, protect it with a strong bearer token and rate limiting. Add this to the nginx configuration for the API path:
# In the /api/ location block, add IP allowlisting:
location /api/v1/ {
    # Only allow specific IPs for API access
    allow 10.0.0.0/8;
    allow 172.16.0.0/12;
    allow 192.168.0.0/16;
    deny all;

    limit_req zone=api_limit burst=10 nodelay;
    proxy_pass http://openwebui;
    # ... rest of proxy headers
}
Fail2Ban for Brute Force Protection
Install Fail2Ban to block repeated failed login attempts:
sudo apt install -y fail2ban

cat > /etc/fail2ban/jail.d/chatgpt.conf << 'EOF'
[chatgpt-auth]
enabled = true
port = https
filter = chatgpt-auth
logpath = /var/log/nginx/chatgpt-access.log
maxretry = 5
findtime = 600
bantime = 3600
action = iptables-multiport[name=chatgpt, port="http,https"]
EOF

cat > /etc/fail2ban/filter.d/chatgpt-auth.conf << 'EOF'
[Definition]
failregex = ^ .* "POST /api/v1/auths/signin HTTP/.*" (401|403)
ignoreregex =
EOF

sudo systemctl enable fail2ban
sudo systemctl restart fail2ban
Additional Security Measures
- Keep Docker images updated. Pull new images monthly minimum — they contain security patches.
- Disable SSH password authentication. Use key-based auth only:
PasswordAuthentication noin/etc/ssh/sshd_config. - Enable automatic security updates:
sudo apt install -y unattended-upgrades && sudo dpkg-reconfigure -plow unattended-upgrades - Audit container permissions. Neither Ollama nor Open WebUI needs
--privilegedmode. Never add it. - Network segmentation. If possible, place the AI server on a separate VLAN from your main network.
Maintenance: Backups, Updates, and Monitoring
Running a private AI server is not a set-and-forget operation. Models, user data, and conversation history need backup. Containers need updates. GPU health needs monitoring.
Backup Strategy
There are three things to back up:
- Docker Compose configuration: The
docker-compose.ymland any Modelfiles - Open WebUI data: The
/opt/private-chatgpt/data/open-webui/directory contains the SQLite database with users, conversations, and settings - Ollama models: The
/opt/private-chatgpt/data/ollama/directory. These can be re-downloaded, so backup is optional but saves time.
Create a backup script:
cat > /opt/private-chatgpt/backup.sh << 'EOF'
#!/bin/bash
# Backup Private ChatGPT data
BACKUP_DIR="/opt/private-chatgpt/backups"
TIMESTAMP=$(date +%Y%m%d_%H%M%S)
mkdir -p "$BACKUP_DIR"

# Backup Open WebUI data (conversations, users, settings)
tar -czf "$BACKUP_DIR/openwebui-data-$TIMESTAMP.tar.gz" \
  -C /opt/private-chatgpt/data open-webui/

# Backup configuration
tar -czf "$BACKUP_DIR/config-$TIMESTAMP.tar.gz" \
  -C /opt/private-chatgpt \
  docker-compose.yml \
  preload-models.sh \
  Modelfile-* 2>/dev/null

# Clean backups older than 30 days
find "$BACKUP_DIR" -name "*.tar.gz" -mtime +30 -delete

echo "Backup completed: $TIMESTAMP"
EOF
chmod +x /opt/private-chatgpt/backup.sh

# Add to cron — daily at 2 AM
(crontab -l 2>/dev/null; echo "0 2 * * * /opt/private-chatgpt/backup.sh >> /var/log/chatgpt-backup.log 2>&1") | crontab -
Update Procedure
Updating the stack is a three-command process. Always back up first:
cd /opt/private-chatgpt

# Backup before updating
./backup.sh

# Pull latest images
docker compose pull

# Recreate containers with new images
docker compose up -d

# Verify everything is running
docker compose ps
Open WebUI and Ollama both handle database migrations automatically. When a new container starts with your existing data volumes, it upgrades the schema as needed.
GPU Monitoring with nvidia-smi
Set up automated GPU health monitoring to catch issues before they affect users:
cat > /opt/private-chatgpt/gpu-monitor.sh << 'EOF'
#!/bin/bash
# GPU health monitoring script
TEMP_THRESHOLD=85
MEM_THRESHOLD=95
LOG="/var/log/gpu-monitor.log"

# Get GPU stats
GPU_TEMP=$(nvidia-smi --query-gpu=temperature.gpu --format=csv,noheader,nounits 2>/dev/null | head -1)
GPU_MEM_USED=$(nvidia-smi --query-gpu=memory.used --format=csv,noheader,nounits 2>/dev/null | head -1)
GPU_MEM_TOTAL=$(nvidia-smi --query-gpu=memory.total --format=csv,noheader,nounits 2>/dev/null | head -1)

if [ -z "$GPU_TEMP" ]; then
    echo "$(date): ERROR - nvidia-smi failed, GPU may be unresponsive" >> "$LOG"
    exit 1
fi

MEM_PERCENT=$((GPU_MEM_USED * 100 / GPU_MEM_TOTAL))

echo "$(date): GPU Temp=${GPU_TEMP}C, VRAM=${GPU_MEM_USED}/${GPU_MEM_TOTAL}MiB (${MEM_PERCENT}%)" >> "$LOG"

if [ "$GPU_TEMP" -gt "$TEMP_THRESHOLD" ]; then
    echo "$(date): WARNING - GPU temperature ${GPU_TEMP}C exceeds threshold ${TEMP_THRESHOLD}C" >> "$LOG"
    # Optional: send alert via email, Slack webhook, etc.
fi

if [ "$MEM_PERCENT" -gt "$MEM_THRESHOLD" ]; then
    echo "$(date): WARNING - GPU memory usage ${MEM_PERCENT}% exceeds threshold ${MEM_THRESHOLD}%" >> "$LOG"
fi
EOF
chmod +x /opt/private-chatgpt/gpu-monitor.sh

# Run every 5 minutes
(crontab -l 2>/dev/null; echo "*/5 * * * * /opt/private-chatgpt/gpu-monitor.sh") | crontab -
Container Health Monitoring
Add a simple uptime check that restarts containers if they become unresponsive:
cat > /opt/private-chatgpt/health-check.sh << 'EOF'
#!/bin/bash
# Check container health and restart if needed
LOG="/var/log/chatgpt-health.log"

# Check Ollama
if ! curl -sf http://localhost:11434/api/tags > /dev/null 2>&1; then
    echo "$(date): Ollama unresponsive, restarting..." >> "$LOG"
    cd /opt/private-chatgpt && docker compose restart ollama
fi

# Check Open WebUI
if ! curl -sf -o /dev/null http://localhost:3000 2>&1; then
    echo "$(date): Open WebUI unresponsive, restarting..." >> "$LOG"
    cd /opt/private-chatgpt && docker compose restart open-webui
fi
EOF
chmod +x /opt/private-chatgpt/health-check.sh

# Run every 10 minutes
(crontab -l 2>/dev/null; echo "*/10 * * * * /opt/private-chatgpt/health-check.sh") | crontab -
Log Rotation
Prevent logs from consuming all disk space:
sudo cat > /etc/logrotate.d/private-chatgpt << 'EOF'
/var/log/chatgpt-*.log /var/log/gpu-monitor.log {
    weekly
    rotate 8
    compress
    delaycompress
    missingok
    notifempty
    create 0644 root root
}
EOF
Performance Tuning Tips
Out of the box, the configuration above works well. But there are adjustments you can make based on your specific hardware and usage patterns.
VRAM Management
If users frequently switch between models, increase OLLAMA_MAX_LOADED_MODELS to keep more models hot in VRAM. Each loaded 7B model uses about 5 GB of VRAM. On a 24 GB card, you can keep 3–4 quantized 7B models loaded simultaneously:
# In docker-compose.yml, under ollama environment:
- OLLAMA_MAX_LOADED_MODELS=4
Context Length
The default context length in Ollama is 2048 tokens for most models, which is short. Increase it for longer conversations:
# Set at runtime via the API or in a Modelfile
PARAMETER num_ctx 8192
Note that longer context uses more VRAM. An 8B model with 8192 context uses approximately 1–2 GB more VRAM than the same model with 2048 context.
Concurrent Request Handling
The OLLAMA_NUM_PARALLEL environment variable controls how many requests Ollama processes simultaneously. More parallel requests mean more VRAM usage. For a 24 GB GPU running 7B models, 4 parallel requests is reasonable. For smaller GPUs, reduce to 2:
- OLLAMA_NUM_PARALLEL=2Related Articles
- How to Install Ollama on Linux: Complete Guide for Ubuntu, Fedora, and RHEL (2026)
- Self-Hosted ChatGPT Alternatives on Linux: Complete Deployment Guide (2026)
- Open WebUI Custom Pipelines and Functions on Linux
- LibreChat on Linux: Complete Installation and Multi-Provider Configuration Guide
Further Reading
- Grootendorst, M. & Alammar, J. (2025). An Illustrated Guide to AI Agents. O'Reilly Media. Covers agent memory systems, RAG pipelines, tool usage, MCP protocol, and context engineering with clear visual explanations.
- Ranjan, R. et al. (2025). Agentic AI in Enterprise. Apress. Explores enterprise AI architecture, RAG vs fine-tuning trade-offs, vector databases, prompt engineering, GPU acceleration, and Kubernetes orchestration for production AI.
- Brousseau, D. & Sharp, T. (2025). LLMs in Production. Manning Publications. Covers neural network fundamentals, transformer architecture, GPU management, latency optimization, Kubernetes deployment, MLOps pipelines, embeddings, and model quantization.
FAQ
How much does it cost to run a private ChatGPT server?
The main cost is the GPU. A used NVIDIA Tesla P40 (24 GB VRAM) runs $100–$150 on eBay and handles 7B–8B models well. A complete server build with CPU, RAM, and storage can be assembled for $300–$500 using used enterprise parts. Electricity costs for a single GPU under moderate load are typically $10–$20 per month. After hardware, there are no per-token or subscription fees — you run as many queries as you want for free. For a team of 10–20 people, the total cost of ownership is dramatically lower than paying $20/user/month for commercial ChatGPT subscriptions.
Which models should I install for general team use?
Start with Llama 3.1 8B — it is the best balance of quality, speed, and VRAM usage for most tasks including writing, summarization, analysis, and Q&A. Add Mistral 7B as a lighter alternative for quick tasks. If your team writes code, add CodeLlama 13B or DeepSeek Coder V2. For document search (RAG), add nomic-embed-text as the embedding model. You can always add more models later without disrupting existing ones. Avoid jumping straight to 70B+ models unless you have 48+ GB of VRAM — a fast 8B model is more useful than a slow 70B model for most interactive use cases.
Can I use this setup without an NVIDIA GPU?
Yes, but with limitations. Ollama supports CPU-only inference — just remove the GPU-related sections from the Docker Compose file (the deploy.resources.reservations block and NVIDIA_VISIBLE_DEVICES). Performance will be significantly slower: expect 2–5 tokens per second on a modern CPU versus 30–80 on a mid-range GPU. This is usable for occasional queries but frustrating for interactive conversation. AMD GPU users can use the ollama/ollama:rocm Docker image instead, which supports RX 7900 XTX, RX 7900 XT, RX 6900 XT, and Radeon Pro W7900 with ROCm 6.x. Apple Silicon Macs work well with native Ollama but cannot use Docker GPU passthrough.
Is my data really private with this setup?
Yes. Every component runs on your server. Ollama performs inference locally — model weights are stored on your disk and all computation happens on your GPU. Open WebUI stores conversation history in a local SQLite database inside the Docker volume. No data is sent to any external service. The models themselves are open-weight and do not phone home. The only external network calls are when you pull model updates from the Ollama registry, and you can disable that by running fully offline after initial setup. For air-gapped environments, you can pre-download models on an internet-connected machine and transfer them via USB or local network.
How do I add the server to our company's SSO or LDAP?
Open WebUI supports OAuth 2.0 and OpenID Connect (OIDC) for enterprise single sign-on integration. Add these environment variables to the Open WebUI service in Docker Compose to connect to your identity provider:
- OAUTH_CLIENT_ID=your-client-id
- OAUTH_CLIENT_SECRET=your-client-secret
- OPENID_PROVIDER_URL=https://your-idp.com/.well-known/openid-configuration
- OAUTH_PROVIDER_NAME=Corporate SSO
- OAUTH_SCOPES=openid email profile
This works with Keycloak, Authentik, Azure AD, Okta, Google Workspace, and any OIDC-compliant provider. Once configured, the login page shows a "Sign in with Corporate SSO" button alongside or instead of the email/password form. For LDAP specifically, you will need an OIDC bridge like Keycloak or Authelia in front of your LDAP directory, as Open WebUI does not support direct LDAP bind.