LocalAI is one of those projects that solves a problem so cleanly that once you understand what it does, you wonder why it is not more widely known. It is a self-hosted, OpenAI API-compatible server that runs local models for text generation, embeddings, image generation, text-to-speech, and speech-to-text — all behind a single API that mirrors OpenAI's endpoints exactly. If you have code that calls https://api.openai.com/v1/chat/completions, you can point it at your LocalAI instance by changing the base URL and it works without modifying a single line of application logic.
This is not just a parlor trick. The OpenAI API has become the de facto standard for LLM integration. Thousands of applications, libraries, and frameworks are built against it. LocalAI lets you swap in local models behind that same interface, which means you get data privacy, zero API costs, and no rate limits while keeping full compatibility with your existing tooling. This guide covers the complete setup on Linux, from installation through production deployment, including GPU acceleration and the practical differences between LocalAI and Ollama.
What LocalAI Actually Is (and Is Not)
LocalAI is a Go application that wraps multiple inference backends behind an OpenAI-compatible REST API. Under the hood, it uses: For GPU driver setup, see our NVIDIA driver and CUDA installation guide.
- llama.cpp — For GGUF model inference (the same backend Ollama uses)
- whisper.cpp — For speech-to-text (Whisper model)
- Piper — For text-to-speech
- Stable Diffusion.cpp — For image generation
- Various embedding backends — For vector embeddings
What LocalAI is not is a model training platform, a chat UI, or a model manager. It does not download models for you (though the gallery feature simplifies discovery). It does not provide a web interface for chatting. It is purely an API server — you bring the models, it serves them through OpenAI-compatible endpoints.
Installation: Docker (Recommended)
Docker is the fastest path to a working LocalAI instance. The project provides pre-built images for CPU-only, CUDA (NVIDIA), and ROCm (AMD) backends.
CPU-Only
docker run -d --name localai \
    -p 8080:8080 \
    -v /opt/localai/models:/models \
    -e MODELS_PATH=/models \
    localai/localai:latest-cpu
NVIDIA GPU (CUDA)
# Make sure nvidia-container-toolkit is installed
sudo apt install -y nvidia-container-toolkit
sudo systemctl restart docker

docker run -d --name localai \
    --gpus all \
    -p 8080:8080 \
    -v /opt/localai/models:/models \
    -e MODELS_PATH=/models \
    localai/localai:latest-gpu-nvidia-cuda-12
AMD GPU (ROCm)
docker run -d --name localai \
    --device /dev/kfd --device /dev/dri \
    --group-add video \
    -p 8080:8080 \
    -v /opt/localai/models:/models \
    -e MODELS_PATH=/models \
    localai/localai:latest-gpu-hipblas
Verify the server is running:
curl http://localhost:8080/v1/models
# Should return: {"object":"list","data":[]}
The empty model list is expected — we have not loaded any models yet.
Installation: Binary (No Docker)
If you prefer running without containers, LocalAI provides pre-compiled binaries:
# Download the latest release
curl -Lo local-ai https://github.com/mudler/LocalAI/releases/latest/download/local-ai-linux-amd64

# For NVIDIA GPU builds:
curl -Lo local-ai https://github.com/mudler/LocalAI/releases/latest/download/local-ai-linux-amd64-nvidia

chmod +x local-ai
sudo mv local-ai /usr/local/bin/

# Create directories
sudo mkdir -p /opt/localai/models

# Run
local-ai --models-path /opt/localai/models --address :8080
Create a systemd service for automatic startup:
sudo tee /etc/systemd/system/localai.service > /dev/null <<'EOF'
[Unit]
Description=LocalAI API Server
After=network.target

[Service]
Type=simple
User=localai
Group=localai
ExecStart=/usr/local/bin/local-ai --models-path /opt/localai/models --address :8080 --threads 8
Restart=always
RestartSec=10
LimitNOFILE=65536

[Install]
WantedBy=multi-user.target
EOF

sudo useradd -r -s /usr/sbin/nologin localai
sudo chown -R localai:localai /opt/localai
sudo systemctl daemon-reload
sudo systemctl enable --now localai
Loading GGUF Models
LocalAI supports GGUF models directly — the same format used by llama.cpp and Ollama. Download a model from HuggingFace and create a configuration file.
# Download a quantized Llama 3.1 8B model
cd /opt/localai/models
wget https://huggingface.co/QuantFactory/Meta-Llama-3.1-8B-Instruct-GGUF/resolve/main/Meta-Llama-3.1-8B-Instruct.Q4_K_M.gguf
Create a model configuration YAML file. This is the core of how LocalAI works — each model gets a YAML file that defines its parameters and maps it to an API model name:
# /opt/localai/models/llama3.1-8b.yaml
name: llama-3.1-8b
backend: llama-cpp
parameters:
  model: Meta-Llama-3.1-8B-Instruct.Q4_K_M.gguf
  temperature: 0.7
  top_p: 0.9
  top_k: 40

context_size: 8192
threads: 8
gpu_layers: 35  # Number of layers to offload to GPU (0 for CPU only)

template:
  chat_message: |
    <|start_header_id|>{{.RoleName}}<|end_header_id|>

    {{.Content}}<|eot_id|>
  chat: |
    <|begin_of_text|>{{.Input}}
    <|start_header_id|>assistant<|end_header_id|>

stopwords:
  - "<|eot_id|>"
  - "<|end_of_text|>"
Restart LocalAI (or it picks up new models automatically depending on your configuration):
sudo systemctl restart localai

# Verify the model is loaded
curl http://localhost:8080/v1/models | python3 -m json.tool
Test chat completions:
curl http://localhost:8080/v1/chat/completions \
    -H "Content-Type: application/json" \
    -d '{
        "model": "llama-3.1-8b",
        "messages": [{"role": "user", "content": "Explain TCP handshake in one paragraph"}],
        "temperature": 0.7
    }'
Loading HuggingFace Models Directly
LocalAI can also load models directly from HuggingFace without manual downloading, using the model gallery or direct configuration:
# In the model YAML, specify a HuggingFace URL
name: phi-3-mini
backend: llama-cpp
parameters:
  model: huggingface://microsoft/Phi-3-mini-4k-instruct-gguf/Phi-3-mini-4k-instruct-q4.gguf
context_size: 4096
gpu_layers: 33
The first time this model is requested, LocalAI downloads it from HuggingFace and caches it locally. Subsequent requests use the cached copy.
The Model Gallery
LocalAI includes a gallery feature that provides pre-configured model definitions. Instead of writing YAML files manually, you can install models from the gallery:
# List available gallery models
curl http://localhost:8080/models/available | python3 -m json.tool | head -50

# Install a model from the gallery
curl -X POST http://localhost:8080/models/apply \
    -H "Content-Type: application/json" \
    -d '{"id": "huggingface@thebloke__llama-2-7b-chat-gguf__llama-2-7b-chat.Q4_K_M.gguf"}'
Gallery models come with pre-configured templates, stop words, and parameters. This saves significant time compared to writing YAML configurations manually, especially for chat models where the prompt template must exactly match the model's training format.
Embeddings
Embeddings are one of LocalAI's strongest features. While Ollama also supports embeddings, LocalAI provides the exact same /v1/embeddings endpoint as OpenAI, making it a seamless drop-in for RAG pipelines and vector databases.
# /opt/localai/models/embedding.yaml
name: text-embedding-ada-002  # Use OpenAI's model name for compatibility
backend: llama-cpp
embeddings: true
parameters:
  model: nomic-embed-text-v1.5.Q8_0.gguf
context_size: 8192
By naming the model text-embedding-ada-002, any code that calls OpenAI's embedding endpoint with that model name will work without changes:
curl http://localhost:8080/v1/embeddings \
    -H "Content-Type: application/json" \
    -d '{
        "model": "text-embedding-ada-002",
        "input": "Linux system administration is a broad field"
    }'
The response format matches OpenAI's exactly, including the embedding vector dimensions and usage statistics.
Image Generation
LocalAI supports image generation through Stable Diffusion models, exposed via the /v1/images/generations endpoint (same as DALL-E's API):
# Download a Stable Diffusion model
cd /opt/localai/models
wget https://huggingface.co/stabilityai/stable-diffusion-2-1/resolve/main/v2-1_768-ema-pruned.safetensors

# Create configuration
# /opt/localai/models/stablediffusion.yaml
name: stablediffusion
backend: stablediffusion
parameters:
  model: v2-1_768-ema-pruned.safetensors
step: 25
cuda: true
curl http://localhost:8080/v1/images/generations \
-H "Content-Type: application/json" \
-d '{
"model": "stablediffusion",
"prompt": "a penguin wearing a sysadmin badge, digital art",
"size": "768x768"
}'Text-to-Speech
LocalAI integrates Piper for text-to-speech, available at /v1/audio/speech:
# Install a Piper voice model via gallery
curl -X POST http://localhost:8080/models/apply \
    -H "Content-Type: application/json" \
    -d '{"id": "voice-en-us-amy-low"}'

# Generate speech
curl http://localhost:8080/v1/audio/speech \
    -H "Content-Type: application/json" \
    -d '{"model": "voice-en-us-amy-low", "input": "The server is running normally."}' \
    --output speech.wav

# Play it
aplay speech.wav
GPU Acceleration Configuration
GPU acceleration in LocalAI is controlled per model through the gpu_layers parameter in the YAML configuration. This determines how many transformer layers are offloaded to the GPU.
# Full GPU offload for a 7B model (typically 32-35 layers)
gpu_layers: 35

# Partial offload (when VRAM is limited)
gpu_layers: 20

# CPU only
gpu_layers: 0
Monitor GPU usage to find the right balance:
# Watch GPU memory as you increase gpu_layers
watch -n 1 nvidia-smi

# Start with 0, then increase by 5 until VRAM is ~80% utilized
# If you go too high, you'll get OOM errors
For NVIDIA GPUs with CUDA, set these environment variables for optimal performance:
# In Docker
docker run -d --name localai \
    --gpus all \
    -e CUDA_VISIBLE_DEVICES=0 \
    -e MODELS_PATH=/models \
    -v /opt/localai/models:/models \
    -p 8080:8080 \
    localai/localai:latest-gpu-nvidia-cuda-12

# For binary install, export before starting
export CUDA_VISIBLE_DEVICES=0
local-ai --models-path /opt/localai/models --address :8080
LocalAI vs Ollama: When to Use Which
Both projects serve local models, but they target different use cases. Here is a practical comparison based on running both in production:
| Feature | LocalAI | Ollama |
|---|---|---|
| API compatibility | Full OpenAI API (chat, embeddings, images, audio) | Own API + partial OpenAI compatibility |
| Model management | Manual YAML configs + gallery | Built-in pull/push with Modelfile |
| Supported modalities | Text, embeddings, images, TTS, STT | Text, embeddings, vision |
| Configuration complexity | Higher (YAML per model) | Lower (pull and run) |
| Model format | GGUF, safetensors, ONNX | GGUF (via Modelfile) |
| Multi-model serving | All models loaded simultaneously | Dynamic loading/unloading |
| Memory management | Static (all models in memory) | Dynamic (unused models evicted) |
| Setup time | 30-60 minutes | 5 minutes |
Use Ollama when: You want the fastest setup, primarily need chat/text generation, want built-in model management, or are serving a small number of models to a chat UI like Open WebUI.
Use LocalAI when: You need drop-in OpenAI API compatibility for existing applications, need multi-modal capabilities (images, TTS, STT) from a single server, or want to serve multiple models simultaneously with fine-grained control over each model's resource allocation.
There is nothing stopping you from running both. A common pattern is using Ollama for interactive chat (with its superior model management) and LocalAI as the API backend for applications that expect OpenAI-compatible endpoints.
Production Deployment with Docker Compose
Here is a production-ready Docker Compose file that runs LocalAI with Nginx for SSL and authentication:
# docker-compose.yml
version: "3.8"

services:
  localai:
    image: localai/localai:latest-gpu-nvidia-cuda-12
    container_name: localai
    restart: unless-stopped
    volumes:
      - ./models:/models
    environment:
      - MODELS_PATH=/models
      - THREADS=8
      - CONTEXT_SIZE=4096
      - DEBUG=false
    deploy:
      resources:
        reservations:
          devices:
            - driver: nvidia
              count: all
              capabilities: [gpu]
    networks:
      - localai-net
    healthcheck:
      test: ["CMD", "curl", "-f", "http://localhost:8080/v1/models"]
      interval: 30s
      timeout: 10s
      retries: 5

  nginx:
    image: nginx:alpine
    container_name: localai-proxy
    restart: unless-stopped
    ports:
      - "443:443"
      - "80:80"
    volumes:
      - ./nginx/localai.conf:/etc/nginx/conf.d/default.conf:ro
      - /etc/letsencrypt:/etc/letsencrypt:ro
    depends_on:
      localai:
        condition: service_healthy
    networks:
      - localai-net

networks:
  localai-net:
    driver: bridge
After starting the stack, verify all endpoints work:
docker compose up -d

# Wait for health check to pass
docker compose ps

# Test endpoints
curl https://your-domain.com/v1/models
curl https://your-domain.com/v1/chat/completions \
    -H "Content-Type: application/json" \
    -H "Authorization: Bearer your-api-key" \
    -d '{"model":"llama-3.1-8b","messages":[{"role":"user","content":"Hello"}]}'
Using LocalAI with Existing OpenAI Client Libraries
The entire point of LocalAI's OpenAI compatibility is that you can use existing libraries without modification. Here are examples in several languages:
Python (openai library)
from openai import OpenAI

client = OpenAI(
    base_url="http://localhost:8080/v1",
    api_key="not-needed"  # LocalAI doesn't require a key by default
)

response = client.chat.completions.create(
    model="llama-3.1-8b",
    messages=[{"role": "user", "content": "List three Linux distributions for servers"}],
    temperature=0.7
)
print(response.choices[0].message.content)
JavaScript/Node.js
import OpenAI from 'openai';

const client = new OpenAI({
    baseURL: 'http://localhost:8080/v1',
    apiKey: 'not-needed'
});

const response = await client.chat.completions.create({
    model: 'llama-3.1-8b',
    messages: [{ role: 'user', content: 'Explain systemd in two sentences' }]
});
console.log(response.choices[0].message.content);
curl (for any language via subprocess)
curl http://localhost:8080/v1/chat/completions \
    -H "Content-Type: application/json" \
    -d '{
        "model": "llama-3.1-8b",
        "messages": [{"role": "user", "content": "What is SELinux?"}],
        "stream": true
    }'
Performance Tuning
A few settings that meaningfully impact performance:
# In model YAML — increase threads for CPU inference
threads: 8  # Match your physical core count, not logical

# Context size affects memory usage linearly
context_size: 4096  # Start here, increase only if needed

# Batch size for prompt processing
batch_size: 512  # Default is usually fine

# For embedding models, enable batching
embeddings: true
batch_size: 256  # Process 256 texts per batch
Monitor actual performance:
# Time a completion request
time curl -s http://localhost:8080/v1/chat/completions \
    -H "Content-Type: application/json" \
    -d '{"model":"llama-3.1-8b","messages":[{"role":"user","content":"Write a haiku about Linux"}]}' \
    | python3 -m json.tool | grep -A2 "usage"
Troubleshooting Common Issues
Model fails to load with "out of memory" error
This usually means you set gpu_layers too high for your available VRAM. Reduce the number incrementally. A 7B Q4 model typically needs about 150 MB per GPU layer, so 35 layers on a 7B model requires roughly 5 GB of VRAM plus overhead for the context window. Run nvidia-smi while loading to see exactly where memory runs out.
Chat template produces garbled output
Every model family (Llama, Mistral, Phi, Gemma) uses a different chat template format. If you use the wrong template, the model receives mangled input and produces nonsensical output. Check the model's HuggingFace page for the correct template format. Common symptoms include the model repeating the system prompt, generating the user's message back, or producing raw template tokens like <|im_start|> in the output.
Embeddings return wrong dimensions
Some embedding models produce different dimension vectors depending on configuration. If your vector database expects 1536 dimensions (OpenAI's ada-002 default) but your local model produces 768, you will get insertion errors. Check the model documentation for its native embedding dimensions and configure your vector database accordingly. You cannot easily change a model's embedding dimensions — you need to choose a model that matches your requirements or re-index your vector store.
High latency on first request
The first request to a model is always slower because LocalAI loads the model weights into memory (and GPU VRAM if configured). Subsequent requests are fast because the model stays loaded. For production, send a warmup request after startup to pre-load the model. Add a health check script that curls each model endpoint during the Docker healthcheck.
Security Hardening for Production
LocalAI does not include authentication by default. For any deployment beyond localhost, add security layers:
# Run behind nginx with basic auth
# /etc/nginx/conf.d/localai.conf
server {
    listen 443 ssl;
    server_name localai.example.com;

    ssl_certificate /etc/letsencrypt/live/localai.example.com/fullchain.pem;
    ssl_certificate_key /etc/letsencrypt/live/localai.example.com/privkey.pem;

    # API key authentication via header
    if ($http_authorization != "Bearer your-secret-key-here") {
        return 401;
    }

    location / {
        proxy_pass http://127.0.0.1:8080;
        proxy_buffering off;
        proxy_read_timeout 600s;
        proxy_set_header Host $host;
        proxy_set_header X-Real-IP $remote_addr;
    }
}
Additional hardening steps include binding LocalAI to localhost only (--address 127.0.0.1:8080), running it as a non-root user, and using systemd's sandboxing features (NoNewPrivileges=true, ProtectSystem=strict) to limit the process's access to the filesystem. If running in Docker, do not publish port 8080 directly — let Nginx handle external access through the Docker network.
For multi-tenant environments where different teams should access different models, run separate LocalAI instances with different model directories and expose them through different nginx locations with separate authentication credentials. There is no built-in per-model access control in LocalAI, so infrastructure-level isolation is the practical approach.
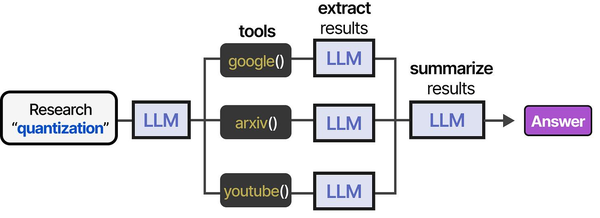
Running an OpenAI-compatible API server locally with LocalAI fits squarely into the tool-integration paradigm described in An Illustrated Guide to AI Agents by Grootendorst and Alammar. The book illustrates how agents use tool pipelines — from research to extraction to summarization — which is exactly the kind of workflow LocalAI enables on self-hosted Linux infrastructure.
Related Articles
- Self-Hosted ChatGPT Alternatives on Linux: Complete Deployment Guide (2026)
- vLLM on Linux: Production Deployment Guide for High-Throughput Inference
- LibreChat on Linux: Complete Installation and Multi-Provider Configuration Guide
- Continue.dev and Ollama: Self-Hosted AI Coding Assistant for VS Code on Linux
Further Reading
- An Illustrated Guide to AI Agents by Maarten Grootendorst and Jay Alammar — Visual guide to agent memory, tools, and reasoning.
- LLMs in Production by Christopher Brousseau and Matthew Sharp — Practical deployment of language models from training to production.
- Agentic AI in Enterprise by Sumit Ranjan, Divya Chembachere, and Lanwin Lobo — Enterprise architecture patterns for agentic AI systems.
Frequently Asked Questions
Can LocalAI run multiple models simultaneously?
Yes, and this is one of its key differences from Ollama. Every model defined in the models directory is loaded at startup and stays in memory. This means instant responses without model loading delays, but it also means higher memory usage. If you have a 7B chat model and an embedding model loaded, expect 6-8 GB of VRAM usage. Plan your GPU memory budget accordingly and only define models you actually need.
Does LocalAI support streaming responses?
Yes. Set "stream": true in the request body, exactly as you would with the OpenAI API. The response uses server-sent events (SSE) in the same format as OpenAI, so any streaming client that works with OpenAI will work with LocalAI. Make sure your reverse proxy has proxy_buffering off set to avoid buffering the stream.
How does LocalAI handle concurrent requests?
LocalAI queues requests per model. If two requests hit the same model simultaneously, the second waits for the first to complete. This is a limitation of llama.cpp's single-sequence inference. For higher concurrency, run multiple LocalAI instances behind a load balancer, each with the same models loaded. Embedding requests are an exception — they can be batched and processed efficiently in parallel.
Is LocalAI compatible with LangChain and LlamaIndex?
Yes. Both frameworks support custom OpenAI base URLs. In LangChain, use ChatOpenAI(base_url="http://localhost:8080/v1"). In LlamaIndex, set the api_base parameter on the OpenAI LLM class. All chat completions, embeddings, and function calling features work through these frameworks without modification.
What happens if a model file is corrupted or missing?
LocalAI logs an error for that specific model but continues running with the remaining models. The failed model will not appear in the /v1/models response. Check the LocalAI logs (docker logs localai or journalctl -u localai) for detailed error messages. Re-download the model file and restart the service to recover.